 Save
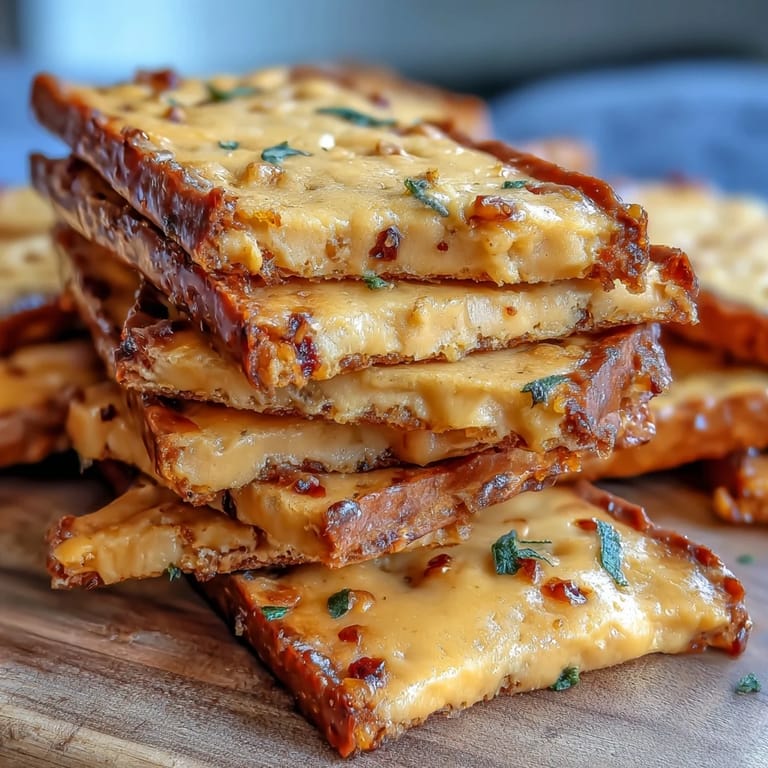
Save My neighbor brought a plate of these to our Derby Day gathering, still warm from her oven, and they disappeared faster than the horses crossed the finish line. The buttery snap when you bit into one, followed by that sharp cheddar tang and the cayenne's subtle kick—it was the kind of snack that made everyone ask for the recipe before they'd even finished chewing. I started making them myself that same week, and now I can't imagine throwing a party without a batch cooling on the rack while guests arrive.
I'll never forget the year my sister-in-law twisted half the batch into little spirals for aesthetic points while I kept mine straight and simple. Hers looked like edible jewelry lined up on the platter, and I was slightly jealous until we tasted them side by side—they were identical, which somehow made us both laugh. Now twisting is non-negotiable whenever I make them for a crowd.
Ingredients
- Sharp cheddar cheese, freshly grated: Freshly grated makes all the difference because pre-shredded cheese has anti-caking agents that prevent these from getting as crispy and flaky—trust me, I learned this the hard way on my first batch.
- Parmesan cheese, finely grated: This adds a nutty, salty depth that cheddar alone can't achieve, giving these straws their sophisticated edge.
- Unsalted butter, cold and cubed: Cold butter is essential—it creates those little pockets that make the straws flaky and delicate, almost like a savory cracker.
- All-purpose flour: The flour is your structure, binding everything together while staying tender because of all that butter and cheese.
- Cayenne pepper: Start with the ½ teaspoon, taste the dough, and adjust upward if you like more heat—I once went too heavy-handed and my mouth was on fire in the best way possible.
- Fine sea salt and freshly ground black pepper: These round out the flavors and prevent the straws from tasting one-dimensional or flat.
- Cold water: Keep this on standby—depending on humidity and how much you've worked the dough, you might need a splash to bring it together without overdoing it.
Tired of Takeout? 🥡
Get 10 meals you can make faster than delivery arrives. Seriously.
One email. No spam. Unsubscribe anytime.
Instructions
- Set your stage:
- Preheat the oven to 375°F and line your baking sheet with parchment—this is your insurance policy against sticking and burning on the bottom. Getting this ready before you start means you're not scrambling when the dough is ready to bake.
- Blend your dry ingredients:
- Pulse the cheddar, Parmesan, flour, cayenne, salt, and pepper in the food processor until everything is evenly distributed and smells absolutely incredible. You'll know it's right when it looks like breadcrumbs and there are no visible cheese clumps.
- Cut in the cold butter:
- Add your cubed cold butter and pulse—don't blend—until the mixture resembles coarse sand with some pea-sized butter pieces still visible. This is crucial because those little butter pockets are what create flakiness when they melt in the oven.
- Bring the dough together:
- If the mixture seems too crumbly, add cold water one tablespoon at a time, pulsing gently between additions until the dough just barely holds together. It should feel slightly crumbly but not wet—if you overwork it, your straws will be tough instead of tender.
- Roll out the dough:
- Turn everything onto a lightly floured surface and roll gently into a rectangle about ¼ inch thick, working with a light hand to keep things flaky. If the dough gets warm or starts sticking, pop it in the fridge for 5 minutes—it'll thank you with better texture.
- Cut into straws:
- Use a sharp knife or pastry cutter to cut strips about ½ inch wide and 6 inches long—think of them like little breadsticks. If you want to twist them, do it now, giving each one a gentle spiral before placing it on the sheet.
- Arrange and bake:
- Space the straws slightly apart on your parchment-lined sheet so they have room to crisp up without touching. Bake for 12 to 15 minutes until they're golden brown and look absolutely irresistible—your kitchen will smell like a cheese dream.
- Cool with patience:
- Let them rest on the baking sheet for 5 minutes to firm up, then transfer to a wire rack to cool completely so they stay crispy. This is the hardest part because the aroma will make you want to eat them immediately, but patience pays off.
 Save
Save There was a moment at last year's Derby party when someone grabbed the last straw, looked genuinely sad that there weren't more, and asked if I'd make them for her book club. That's when I realized these little cheese straws had become part of something bigger than just a snack—they're the thing people remember and ask for by name.
Storage and Make-Ahead Magic
These straws are actually better made a day ahead because they have time to fully crisp as they cool and rest in an airtight container. Keep them in a sealed container at room temperature for up to three days, or freeze the unbaked dough for up to a month if you want straws on demand without the prep work every time.
Flavor Variations Worth Trying
Once you master the basic recipe, you can play around with what you love—smoked paprika on top before baking adds a deeper flavor, a pinch of garlic powder brings savory complexity, or fresh rosemary mixed into the dough makes them feel more gourmet. I've even made them with aged white cheddar and black pepper for a slightly different vibe that guests loved.
Pairing and Serving Ideas
These straws shine alongside almost anything—serve them with a spread of whipped goat cheese mixed with herbs, set them in a tall glass to make a statement on the appetizer table, or just pile them on a plate with some good olives and cured meats. They're crispy enough to hold up to dips, sturdy enough to stand on their own, and elegant enough to make you look like you spent all day in the kitchen when you really didn't.
- Twist half the batch for visual interest and to give guests an easy handle while standing and mingling.
- Make a double batch because they go faster than you'd think, and having extras means leftovers for snacking later.
- If you want them extra special, sprinkle a tiny pinch of fleur de sel on top right after they come out of the oven while still warm.
 Save
Save These cheese straws have become my go-to when I want to show up somewhere with something homemade that feels special without the stress. They're proof that sometimes the simplest recipes, made with good ingredients and a little care, become the ones people remember.
Recipe FAQs
- → What type of cheese is best for these straws?
Sharp cheddar and finely grated Parmesan provide the ideal balance of sharpness and depth for a rich flavor.
- → How can I adjust the spiciness level?
Modify the amount of cayenne pepper to suit your taste, starting with ½ teaspoon and increasing gradually.
- → Can I prepare the dough ahead of time?
Yes, the dough can be refrigerated for a few hours before rolling and baking to enhance flavor and texture.
- → What is the best way to store leftover straws?
Airtight containers keep them crisp for several days at room temperature; avoid moisture to maintain crunch.
- → Are there suggestions for serving these straws?
They pair well with mint juleps or as part of a savory appetizer spread, perfect for parties or casual snacks.