 Save
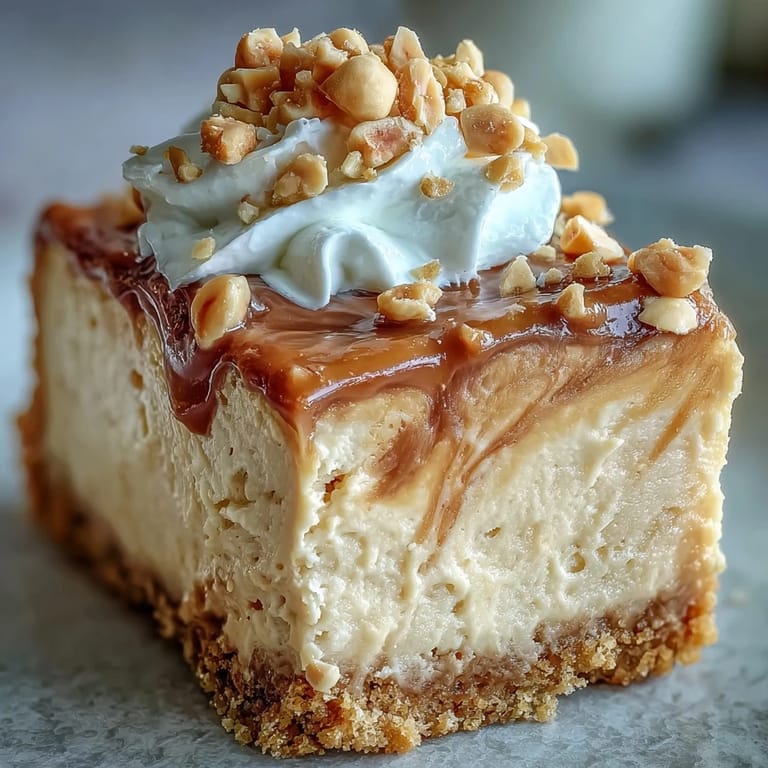
Save My friend Maya challenged me to make the richest peanut butter dessert I could imagine, and I knew exactly where to start: Nutter Butters. The cookies I grew up sneaking from the pantry became the foundation for this silky, indulgent cheesecake. Every bite delivers that nostalgic peanut butter punch wrapped in cream cheese luxury. I brought it to her birthday dinner, and she nearly cried when she tasted it. Now it's the dessert I make when I really want to impress someone.
I served this at a potluck once, and three people asked for the recipe before dessert was even finished. One guest admitted she doesn't usually like cheesecake, but scraped her plate clean anyway. The combination of that salty sweet crust and the cloud like whipped topping makes it impossible to resist. I've learned to always make extra, because someone will inevitably ask for seconds. It's become my signature dish without me ever planning for it to be.
Ingredients
- Nutter Butter cookies: The soul of this dessert, crushed into a crust that stays crunchy and delivers pure peanut butter nostalgia in every bite.
- Unsalted butter: Binds the cookie crumbs together and adds richness without making the crust greasy, melted until just liquid works best.
- Cream cheese: The creamy base that must be truly softened at room temperature or you'll end up with lumps no amount of mixing can fix.
- Granulated sugar: Sweetens the filling without overpowering the peanut butter, and helps create that signature cheesecake texture.
- Vanilla extract: A small addition that brightens all the other flavors and makes the peanut butter taste even more vibrant.
- Eggs: The binder that gives the cheesecake structure, added one at a time and mixed gently to avoid incorporating too much air.
- Creamy peanut butter: Swirled through the filling for pockets of intense flavor, use the regular kind not natural or it will separate.
- Heavy whipping cream: Whipped into stiff peaks with powdered sugar to create a topping that feels like sweet clouds.
- Powdered sugar: Sweetens the whipped cream without any graininess, and helps it hold its shape on top of the chilled cheesecake.
- Chopped peanuts: Optional but highly recommended for a salty crunch that contrasts beautifully with the creamy filling.
Tired of Takeout? 🥡
Get 10 meals you can make faster than delivery arrives. Seriously.
One email. No spam. Unsubscribe anytime.
Instructions
- Prep Your Pan:
- Preheat your oven to 325°F and grease a 9 inch springform pan, then line the bottom with parchment paper. This simple step prevents sticking and makes releasing the finished cheesecake so much easier.
- Build the Crust:
- Crush the Nutter Butters until they're fine crumbs, then mix with melted butter until the texture looks like wet sand. Press firmly into the pan bottom using the back of a measuring cup to create an even, compact layer.
- Set the Base:
- Bake the crust for 10 minutes to lock in its structure and deepen the toasty flavor. Let it cool completely before adding the filling or the heat will start cooking the cream cheese too soon.
- Cream the Filling:
- Beat softened cream cheese and sugar with an electric mixer on medium speed until smooth and fluffy, about 2 to 3 minutes. Scrape down the bowl halfway through to ensure no lumps hide at the bottom.
- Add the Peanut Butter:
- Mix in vanilla extract and creamy peanut butter until fully incorporated and the mixture looks uniform. The peanut butter should blend in completely, creating a pale tan filling.
- Incorporate the Eggs:
- Add eggs one at a time on low speed, mixing just until each disappears into the batter. Overmixing at this stage traps air that can cause cracks, so keep it gentle and brief.
- Assemble and Smooth:
- Pour the cream cheese mixture over the cooled crust and smooth the top with a spatula, coaxing it into an even layer. Tap the pan gently on the counter to release any trapped air bubbles.
- Bake Low and Slow:
- Bake for 50 to 60 minutes until the edges look set but the center still jiggles slightly when you gently shake the pan. The residual heat will finish cooking the middle as it cools.
- Cool in the Oven:
- Turn off the oven and crack the door open, letting the cheesecake cool inside for a full hour. This gradual temperature drop prevents the dreaded cracks that come from shocking the delicate filling.
- Chill Thoroughly:
- Remove from the oven and refrigerate at least 4 hours, though overnight is even better for the flavors to deepen and the texture to firm up. Patience here is everything.
- Whip the Topping:
- Before serving, whip heavy cream with powdered sugar until stiff peaks form and the cream holds its shape. Spread it generously over the chilled cheesecake like a soft, sweet blanket.
- Garnish and Serve:
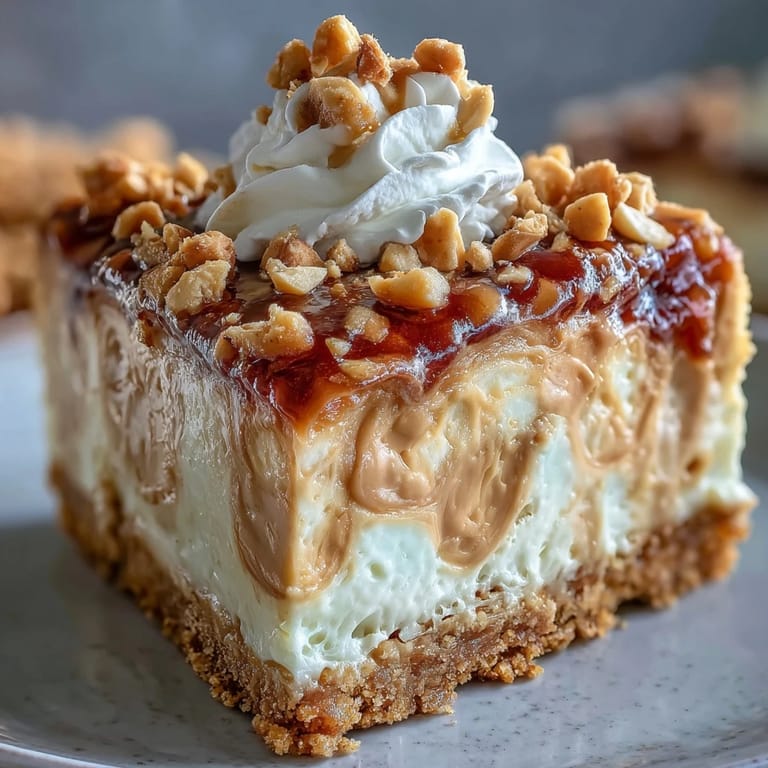
- Sprinkle chopped peanuts over the whipped cream and tuck a few extra Nutter Butters around the edges for drama. Slice with a hot, clean knife for the prettiest cuts and serve cold.
 Save
Save The first time I made this for my family, my dad ate two slices in one sitting and declared it better than any restaurant dessert he'd ever had. My sister, who claims she's not a peanut butter person, quietly came back for thirds when she thought no one was watching. That's when I realized this cheesecake has a way of converting people. It's rich enough to feel special but familiar enough to feel like home. Now it shows up at every holiday table, and I wouldn't have it any other way.
How to Prevent Cracks
Cracks happen when cheesecake cools too fast or gets overbaked, and both are easy to avoid with a little patience. I learned the hard way after my first attempt looked like a desert landscape. Now I always turn off the oven and leave the door cracked for an hour, letting the temperature drop gradually. For extra insurance, you can bake the cheesecake in a water bath by wrapping the springform pan in foil and setting it in a larger pan filled with hot water. The steam keeps the surface moist and the temperature even, though it's not strictly necessary if you follow the cooling method.
Make Ahead and Storage
This cheesecake actually improves after a night in the fridge, as the flavors meld and the texture becomes even creamier. I usually bake it the day before I need it and add the whipped topping just before serving. It will keep covered in the refrigerator for up to five days, though it rarely lasts that long in my house. If you want to freeze it, do so before adding the whipped cream, wrap it tightly in plastic wrap and foil, and it will keep for up to two months. Thaw it overnight in the fridge and top with fresh whipped cream when you're ready to serve.
Serving Suggestions
While this cheesecake is perfect on its own, a drizzle of warm chocolate or caramel sauce takes it to another level of decadence. I've also served it with a handful of fresh raspberries on the side, and the tartness cuts through the richness beautifully. For an over the top presentation, crush a few extra Nutter Butters and press them into the sides of the whipped cream before adding the peanuts.
- Serve with hot coffee or cold milk for the ultimate peanut butter experience.
- Let slices sit at room temperature for 10 minutes before serving so the flavors open up.
- Use a sharp knife dipped in hot water and wiped clean between each slice for perfect cuts.
 Save
Save This cheesecake has become the dessert I'm known for, the one people request by name and remember long after the party ends. I hope it brings as much joy to your table as it has to mine.
Recipe FAQs
- → How long should I chill the cheesecake before serving?
Refrigerate the cheesecake for at least 4 hours, though overnight chilling produces the best texture and flavor. This allows the filling to set completely and makes slicing easier.
- → Can I use a water bath for this cheesecake?
Yes, baking in a water bath creates a creamier texture and helps prevent cracks on the surface. Simply wrap your springform pan in foil and place it in a roasting pan filled with hot water.
- → Why is the center still jiggly after baking?
A slightly jiggly center is perfectly normal. The cheesecake continues to set as it cools. Over-baking will cause cracks and a dry, crumbly texture.
- → Can I make this ahead of time?
Absolutely. Making it a day ahead actually improves the flavor. Store in the refrigerator covered loosely with foil, and add whipped cream and garnishes just before serving.
- → What can I use instead of Nutter Butter cookies?
You can substitute with any peanut butter sandwich cookies or graham crackers mixed with a tablespoon of peanut butter to maintain that signature nutty flavor profile.
- → Why do I need to let the cheesecake cool in the oven with the door cracked?
This gradual cooling method prevents sudden temperature changes that cause cracking. It allows the structure to stabilize slowly as it reaches room temperature.